Bundle page
Bundle page allows you to create a page on your Shopify store where customers can add products to a bundle and get a discount based on the rules you define within the application.
Creating bundle page
You can create a new page or update information about a page such as its title, description, products, discounts and banner from the Bundles page.
In this section
- Add a new page
- Edit a page
- Delete a page
- Add a preview link to the storefront
Add a new page
Note
You can create up to 10 pages.
Steps:
- From your Shopify admin, click Apps, and then choose Codify - Product Bundle from the list.
- Go to the Bundles page and click on Bundle page.
-
Click Create page and Enter the details given below.
- Title: the title for your page that you want to display to customers.
- Description: the description for your page that will be displayed below the title. This area uses the rich text editor so that you can format your text.
-
Products: the products that you want to display to the customers. Follow the steps given below to add products.
- In the Products section, click Select products to open a list of products.
-
Choose products from a list and click the Add button.
Note: You can add a maximum of 50 products to a page.
-
Discounts: the discount is applied based on the options that you've set. This includes the following fields:
-
Discount type: a type of discount, whether it is fixed or percentage.
- If you want to add a percentage discount, like add a 5% discount on 3 or more quantities, then select Percentage discount.
- If you want to add a fixed discount, like add a discount of $20.00 on 3 or more quantities, then select Fixed discount.
-
Discount trigger: the value that you want to use for adding a discount, whether it is total price or total quantity.
- If you want to add a discount after specific quantity, like add a 5% discount if quantity is greater than 2, then select Total number of products.
- If you want to add a discount after specific price, like add a 5% discount if total price is greater than $20.00, then select Total price.
-
Set minimum required: a minimum value is required for customers to checkout.
- If you tick the checkbox, it shows the textbox below, where you can add the minimum value required for checkout.
- If the checkbox is unchecked, no minimum value is required for checkout.
- Here, the value is either price or quantity, depending on the value of Discount trigger field.
- If Total number of products is selected in Discount trigger, then it considers Minimum quantity.
- If Total price is selected in Discount trigger, then it considers Minimum price.
-
Tiers: the levels you want to add for various discounts. You can add a maximum of three tiers. Each tier includes the following fields:
-
Discount after this value: if the total price or quantity is greater than the value of this field, the discount entered in Discount field will be applied.
- Here, the value is either price or quantity, depending on the value of Discount trigger field.
- If Total number of products is selected in Discount trigger, then it considers Discount after this quantity.
- If Total price is selected in Discount trigger, then it considers Discount after this price.
-
Discount: the discount is applied when the total quantity or price is greater than the value of Discount after field.
- Here, the discount is either fixed or percentage depending on the value of Discount type field.
-
Discount after this value: if the total price or quantity is greater than the value of this field, the discount entered in Discount field will be applied.
-
Discount type: a type of discount, whether it is fixed or percentage.
- Banner: the image that you want to display at the top of the page. Upload an image with a 2000 pixels height and 600 pixels width for the best appearance. This is an optional field.
-
Additional settings: you might need to adjust a few settings given below.
- Show variants: whether or not to display variants for each product
- Discount name: the name of the discount that will be displayed on the checkout page
- Additional class: a class that you want to add to the parent element of a page for any development purpose.
- Click Save.
Edit a page
After you've created a page, you can edit it to change products, discounts, and any other details.
Steps:
- From your Shopify admin, click Apps, and then choose Codify - Product Bundle from the list.
- Go to the Bundles page, click on Bundle Page, and click the name of the page that you want to change.
- Modify page details.
- Click Save.
Delete a page
If you no longer want to display a page, you can delete it. If you delete a page, it's permanently removed from the application. Deleted page can't be restored.
Steps:
- From your Shopify admin, click Apps, and then choose Codify - Product Bundle from the list.
- Go to the Bundles page and click on Bundle Page.
- In the list, click the remove button on the right side in the same row of a page that you want to delete.
- Click Delete.
Add a preview link to the storefront
After you’ve created a page, you can copy the link of a page and add it to your storefront.
Steps:
- From your Shopify admin, click Apps, and then choose Codify - Product Bundle from the list.
- Go to the Bundles page, click on Bundle Page and then click the name of a page from the list.
- Click the Copy link button at the bottom to copy the link to the clipboard.
- Go to Online Store > Navigation.
- On the Navigation page, click the title of the menu in which you want to add this link.
- Click Add menu item.
- Enter a name for the menu item, click the Link field and paste the copied link.
- Click Add to save your menu item.
- Click Save menu.
For more information about editing menus, refer to Editing menus guide.
Customising settings
You can customise the design, layout and content of a page. These changes will be applied to all bundle pages.
In this section
- Design
- Layout
- Page content
Design
You can change design of a page, like text color, size, and button style, and add custom CSS rules if you are familiar with CSS.
Steps:
- From your Shopify admin, click Apps, and then choose Codify - Product Bundle from the list.
- Go to the Settings and click on Bundle Page.
-
From the Design section, you can customise the design by using the options given below:
-
Primary heading: options for changing the style of h1 and h2 tags on a page include the following fields:
- Font size: a font size is applied to all h1 tags.
- Color: a Color is applied to all h1 and h2 tags.
-
Secondary heading: options for changing the style of h3 and the rest of the heading tags on a page include the following fields:
- Font size: a font size is applied to all h3 tags.
- Color: a color is applied to all the heading tags (except h1 and h2) .
-
Body: options for changing the style of the rest of the body text on a page include the following fields:
- Font size: a font size is applied to the rest of the body text.
- Color: a color is applied to the rest of the body text.
-
Sale text color: a color is applied to sale price, discount, and promotion text:
-
Buttons: options for changing button style include the following fields:
- Corner radius: a border radius is applied to the button.
- Font size: a font size is applied to the button text.
- Background color: a color is applied to the button background.
- Text color: a color is applied to the button text.
- Background color on hover: a color is applied to the button background on hover.
- Text color on hover: a color is applied to the button text on hover.
- Custom CSS: if you are familiar with CSS, you can add your custom CSS rules in this field. This is an optional field.
-
Primary heading: options for changing the style of h1 and h2 tags on a page include the following fields:
- Click Save.
Layout
Layout allows you to change page width, text alignment, and grid settings.
Steps:
- From your Shopify admin, click Apps, and then choose Codify - Product Bundle from the list.
- Go to the Settings page and click on Bundle Page.
-
From the Layout section, you can customise the layout by using the options given below:
- Page width: a page width can be either Full or Custom. If you select Custom, it shows the textbox below, where you can add a custom page width.
-
Text alignment: options for aligning the page title, description, and grid text include the following fields:
- Page title and description: align the text of the page title and description.
- Grid title and price: align the title and price text in the product grid.
-
Grid: options for adjusting the items per row and spacing between items in a grid include the following fields:
- Products per row in desktop: adjust the number of products per row on the desktop.
- Products per row in mobile: adjust the number of products per row in mobile.
- Horizontal spacing: a horizontal spacing is applied between the products.
- Vertical spacing: a vertical spacing is applied between the products.
- Click Save.
Page content
You can set the wording of your choice for the buttons in a product grid and the text in Price details section.
Steps:
- From your Shopify admin, click Apps, and then choose Codify - Product Bundle from the list.
- Go to the Settings page and click on Bundle Page.
-
From the Page content section, you can customise the content by using the options given below:
-
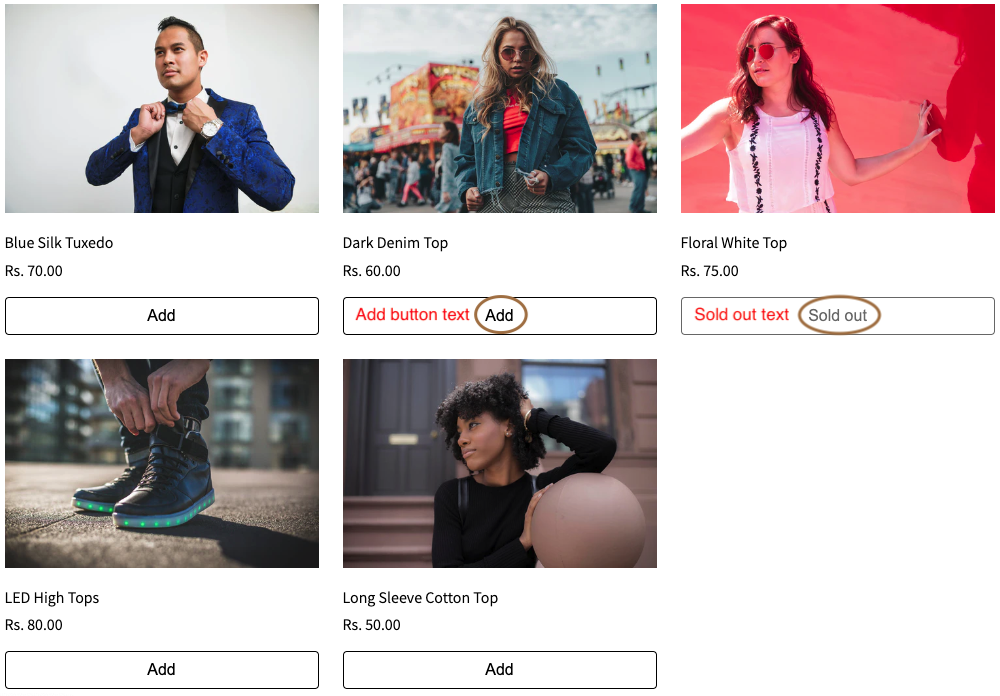
Product grid: options for changing button text in a product grid include the following fields:
- Add button: a text for the Add button.
-
Sold out: a text for the Sold out label.
-
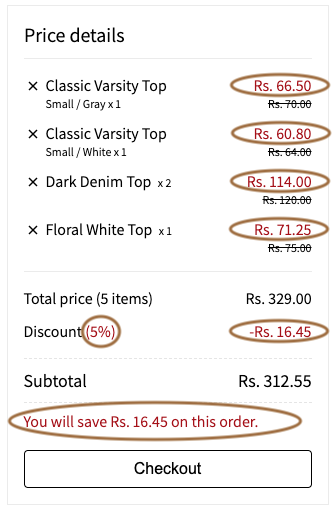
Price detail: options for changing the text in the Price details section include the following fields:
- Heading: a text for the heading of the Price details section.
- Checkout button: a text for the Checkout button.
-
Save amount on order: a text for the promotional message that is displayed below the subtotal. Here, [amount] will be replaced by the actual amount.

-
Minimum required to checkout: a text for the alert message that is displayed below the checkout button. Here, [amount] and [unit] will be replaced by the actual value.
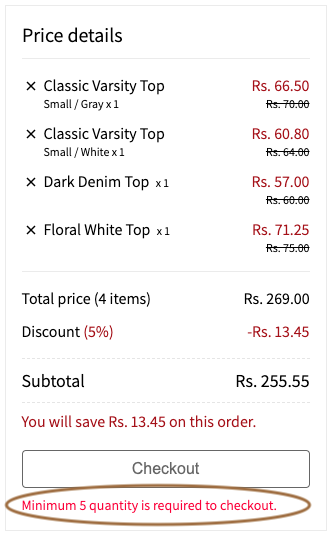
-
Product grid: options for changing button text in a product grid include the following fields:
- Click Save.